Tutorial
Let’s create a TreeFrog Application.
We’ll try to make a simple blog system which can list, view, and add/edit/delete text.
Generate the Application Skeleton
First we will need to make a skeleton (various settings files and a directory tree). We’ll use the name “blogapp”. Run the following command from the command line. (In Windows, please run from the TreeFrog Command Prompt).
 $ tspawn new blogapp
  created   blogapp
  created   blogapp/controllers
  created   blogapp/models
  created   blogapp/models/sqlobjects
  created   blogapp/views
  created   blogapp/views/layouts
  created   blogapp/views/mailer
  created   blogapp/views/partial
   :
Create a Table
Now we need to create a table in the database. We’ll create the field title and content (body). Here are examples in MySQL and SQLite’
Example in MySQL:
Set the character set to UTF-8. You can also specify this when generating the database (do ensure that it is being set correctly, see FAQ). You can specify the configuration file for the database, as described below. Also, make the path through into MySQL using the command line tool.
 $ mysql -u root -p
 Enter password:

 mysql> CREATE DATABASE blogdb DEFAULT CHARACTER SET utf8mb4;
 Query OK, 1 row affected (0.01 sec)

 mysql> USE blogdb;
 Database changed

 mysql> CREATE TABLE blog (id INTEGER AUTO_INCREMENT PRIMARY KEY, title  VARCHAR(20), body VARCHAR(200), created_at DATETIME, updated_at DATETIME, lock_revision INTEGER) DEFAULT CHARSET=utf8;

 Query OK, 0 rows affected (0.02 sec)

 mysql> DESC blog;
 +---------------+--------------+------+-----+---------+----------------+
 | Field         | Type         | Null | Key | Default | Extra          |
 +---------------+--------------+------+-----+---------+----------------+
 | id            | int(11)      | NO   | PRI | NULL    | auto_increment |
 | title         | varchar(20)  | YES  |     | NULL    |                |
 | body          | varchar(200) | YES  |     | NULL    |                |
 | created_at    | datetime     | YES  |     | NULL    |                |
 | updated_at    | datetime     | YES  |     | NULL    |                |
 | lock_revision | int(11)      | YES  |     | NULL    |                |
 +---------------+--------------+------+-----+---------+----------------+
 6 rows in set (0.01 sec)

 mysql> quit
 Bye
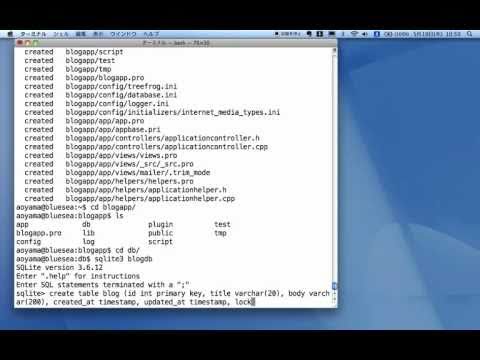
Example in SQLite:
We are going to put the database files in the DB directory.
 $ cd blogapp
 $ sqlite3 db/blogdb
 SQLite version 3.6.12
 sqlite> CREATE TABLE blog (id INTEGER PRIMARY KEY AUTOINCREMENT, title VARCHAR(20), body VARCHAR(200), created_at TIMESTAMP, updated_at TIMESTAMP, lock_revision INTEGER);
 sqlite> .quit
A blog table is created with the fields: id, title, body, created_at, updated_at, and lock_revision.
With the fields updated_at and created_at, TreeFrog will automatically insert the date and time of creation and of each update. The lock_revision field, which is intended for use with optimistic locking, needs to be created as an integer type.
Optimistic Locking
The optimistic locking is used to store data while verifying that information is not locked by being updated by another user. Since there is no actual write lock, you can expect processing to be a little faster. See the section on O/R mapping for more information.
Set the Database Information
Use config/database.ini to set information about the database.
Open the file in the editor, enter the appropriate values for your environment to each item in the [dev] section, and then click Save.
Example in MySQL:
 [dev]
 DriverType=QMYSQL
 DatabaseName=blogdb
 HostName=
 Port=
 UserName=root
 Password=pass
 ConnectOptions=
Example in SQLite:
 [dev]
 DriverType=QSQLITE
 DatabaseName=db/blogdb
 HostName=
 Port=
 UserName=
 Password=
 ConnectOptions=
Once you have correctly set these details, it’s time to display the table to access the DB.
If everything is setup properly, it will display a message like this:
 $ cd blogapp
 $ tspawn --show-tables
 DriverType:   QSQLITE
 DatabaseName: db\blogdb
 HostName:
 Database opened successfully
 -----
 Available tables:
  blog
If a required SQL driver is not included in the Qt SDK, the following error message will appear:
QSqlDatabase: QMYSQL driver not loaded
If you receive this message, the Qt SQL driver may not be installed. Install the driver for the RDBM.
You can check which SQL drivers are installed with the following command;
 $ tspawn --show-drivers
 Available database drivers for Qt:
  QSQLITE
  QMYSQL3
  QMYSQL
  QODBC3
  QODBC
The pre-built SQL driver can be used for SQLite, although the SQLite driver can also be used with a little effort.
Specifying a Template System
In TreeFrog Framework, we can specify either Otama or ERB as a template system. We will set the TemplateSystem parameter in the development.ini file.
TemplateSystem=ERB
  or
TemplateSystem=Otama
ERB is specified by default.
Automatic Generation of Code Created from the Table
From the command line, run the command generator (tspawn) which will generate the underlying code. The example below shows the production of controller, model, and view. The table name is specified as the command argument.
 $ tspawn scaffold blog
 DriverType: QSQLITE
 DatabaseName: db/blogdb
 HostName:
 Database open successfully
   created   controllers/blogcontroller.h
   created   controllers/blogcontroller.cpp
   updated   controllers/controllers.pro
   created   models/sqlobjects/blogobject.h
   created   models/blog.h
   created   models/blog.cpp
   updated   models/models.pro
   created   views/blog
   :
Depending on the tspawn option, only controllers or models can be generated.
Vue.js support
In version 2 and later, it is possible to choose to generate views using vue.js.
  :
 Create sources for vue.js? [y/n] y    ← Enter 'y'
Reference: Help for tspawn command
 $ tspawn --help
 usage: tspawn <subcommand> [args]

 Type 'tspawn --show-drivers' to show all the available database drivers for Qt.
 Type 'tspawn --show-driver-path' to show the path of database drivers for Qt.
 Type 'tspawn --show-tables' to show all tables to user in the setting of 'dev'.
 Type 'tspawn --show-collections' to show all collections in the MongoDB.

 Available subcommands:
   new (n)         <application-name>
   scaffold (s)    <table-name> [model-name]
   controller (c)  <controller-name> action [action ...]
   model (m)       <table-name> [model-name]
   helper (h)      <name>
   usermodel (u)   <table-name> [username password [model-name]]
   sqlobject (o)   <table-name> [model-name]
   mongoscaffold (ms) <model-name>
   mongomodel (mm) <model-name>
   websocket (w)   <endpoint-name>
   api (a)         <api-name>
   validator (v)   <name>
   mailer (l)      <mailer-name> action [action ...]
   delete (d)      <table-name, helper-name or validator-name>
Build the Source Code
To start the build process, run the following command only once; it will generate a Makefile.
$ qmake -r "CONFIG+=debug"
A WARNING message will be displayed, but there is actually no problem. Next, run the make command to compile the controller, model, view, and helper.
$ make (On MSVC run 'nmake' command instead)
If the build succeeds, four shared libraries (controller, model, view, helper) will be created in the lib directory. By default, the library is generated in debug mode; however, you can regenerate the Makefile, using the following command, to create a library in release mode.
Creating a Makefile in release mode:
$ qmake -r "CONFIG+=release"
To Start the Application Server
Change to the root directory of the application before starting the application server (AP server). The server will start to process what it regards as the application root directory to the directory where the command is run. To stop the server, press Ctrl+c.
$ treefrog -e dev
In Windows, start by using treefrogd.exe.
> treefrogd.exe -e dev
In Windows, start by using treefroged.exe when you build web applications in debug mode, and start by using treefrog.exe when you want to build a web application in release mode.
Release and debug modes should not be mixed, as the result will not work properly.
If you want it to run in the background, use the option -d together with any other required options.
$ treefrog -d -e dev
The command option ‘-e’ appears in the above examples. When this is followed by a section name that you have specified in database.ini before, it can be used to change the database settings. If no section name is specified it is assumed that the command refers to a product (when the project is being made, the following three sections are predefined).
| Section | Description |
|---|---|
| dev | For generator, development |
| test | For test |
| product | For official version, production version |
‘-e’ comes from the initials letter of “environment”.
Stop command:
$ treefrog -k stop
Abort command (forced termination):
$ treefrog -k abort
Restart command:
$ treefrog -k restart
If the firewall is in place, make sure that the correct port is open (the default is port 8800).
The following command shows the current URL routing information.
 $ treefrog --show-routes
 Available controllers:
   match   /blog/index  ->  blogcontroller.index()
   match   /blog/show/:param  ->  blogcontroller.show(id)
   match   /blog/create  ->  blogcontroller.create()
   match   /blog/save/:param  ->  blogcontroller.save(id)
   match   /blog/remove/:param  ->  blogcontroller.remove(id)
Reference: Help for treefrog command
$ treefrog -h
Usage: treefrog [-d] [-p port] [-e environment] [-r] [app-directory]
Usage: treefrog -k [stop|abort|restart|status] [app-directory]
Usage: treefrog -m [app-directory]
Options:
  -d              : run as a daemon process
  -p port         : run server on specified port
  -e environment  : specify an environment of the database settings
  -k              : send signal to a manager process
  -m              : show the process ID of a running main program
  -r              : reload app automatically when updated (for development)

Type 'treefrog --show-routes [app-directory]' to show routing information.
Type 'treefrog --settings [app-directory]' to show application settings.
Type 'treefrog -l' to show your running applications.
Type 'treefrog -h' to show this information.
Type 'treefrog -v' to show the program version.
Browser Access
We will now use your web browser to access http://localhost:8800/Blog. A list screen, such as the following should be displayed.
Initially, there is nothing registered.

When two items are registered the options show, edit, and remove become visible. As you can see, there is even no problem in displaying Japanese text.

TreeFrog is equipped with a call method mechanism (Routing system) for the appropriate controller from the requested URL to the action (as well as other frameworks).
Developed source code can work on other platforms, if it is re-built.
To see a sample Web application. You can watch it here.
You can play with this and it will respond at the same speed as the average desktop application.
Source Code of Controller
Let’s take a look at the contents of the controller which is generated.
First, the header file. There are several charm codes, but these are required for sending by URL.
The purpose of public slots is to declare the actions (methods) you want to send. Actions corresponding to the CRUD are defined. Incidentally, the slots keyword is a feature of the Qt extension. Please see the Qt documentation for more details.
class T_CONTROLLER_EXPORT BlogController : public ApplicationController {
public slots:
    void index();                     // Lists all entries
    void show(const QString &id);     // Shows one entry
    void create();                    // New registration
    void save(const QString &id);     // Updates (save)
    void remove(const QString &id);   // Deletes one entry
};
Next, explain the source file. The controller is responsible for invoking the view on request. Calls the service and depending on the result, it calls the template logic with the render() function or redirects with the redirect() function. It is important to write the main processing in the service class and keep the controller logic simple.
static BlogService service;

void BlogController::index()
{
    service.index();  // Calls the service
    render();         // Renders the view, index.erb
}

void BlogController::show(const QString &id)
{
    service.show(id.toInt());  // Calls the service
    render();                  // Renders the view, show.erb
}

void BlogController::create()
{
    int id;

    switch (request().method()) {  // Checks the incoming httpRequest method type
    case Tf::Get:         // GET Method
        render();
        break;
    case Tf::Post:        // POST Method
        id = service.create(request());  // Calls the service
        if (id > 0) {
            redirect(urla("show", id));  // Redirects
        } else {
            render();     // Renders the view, create.erb
        }
        break;

    default:
        renderErrorResponse(Tf::NotFound);
        break;
    }
}

void BlogController::save(const QString &id)
{
    int res;

    switch (request().method()) {
    case Tf::Get:
        service.edit(session(), id.toInt());  // Calls the service
        render();
        break;
    case Tf::Post:
        res = service.save(request(), session(), id.toInt());  // Calls the service
        if (res > 0) {
            // Save completed
            redirect(urla("show", id));  // Redirects to /blog/show
        } else if (res < 0) {
            // Failed
            render();     // Renders the view, save.erb
        } else {
            // Retry
            redirect(urla("save", id));   // Redirects to /blog/save
        }
        break;
    default:
        renderErrorResponse(Tf::NotFound);
        break;
    }
}

void BlogController::remove(const QString &id)
{
    switch (request().method()) {
    case Tf::Post:
        service.remove(id.toInt());  // Calls the service
        redirect(urla("index"));     // Redirects to /blog/index
        break;
    default:
        renderErrorResponse(Tf::NotFound);
        break;
    }
}

// Don't remove below this line
T_DEFINE_CONTROLLER(BlogController)
In the service class, write the original logic that should be processed in the request, so business logic. It can process the model object retrieved from the database and send it to the view, or it can save the data retrieved from the request to the database via the model object. You can also validate the form data.
void BlogService::index()
{
    auto blogList = Blog::getAll();  // Gets a list of all Blog objects
    texport(blogList);               // Sends the data to the view
}

void BlogService::show(int id)
{
    auto blog = Blog::get(id);   // Gets the Blog object by primary key
    texport(blog);               // Sends the data to the view
}

int BlogService::create(THttpRequest &request)
{
    auto items = request.formItems("blog");  // Gets the incoming form data
    auto model = Blog::create(items);        // Creates the Blog object

    if (model.isNull()) {
        QString error = "Failed to create.";  // Error message
        texport(error);
        return -1;
    }

    QString notice = "Created successfully.";
    tflash(notice);           // Sets a flash message
    return model.id();
}

void BlogService::edit(TSession& session, int id)
{
    auto model = Blog::get(id);    // Gets the Blog object
    if (!model.isNull()) {
        session.insert("blog_lockRevision", model.lockRevision());  // Stores the lock revision to the session
        auto blog = model.toVariantMap();
        texport(blog);      // Sends to the view
    }
}

int BlogService::save(THttpRequest &request, TSession &session, int id)
{
    int rev = session.value("blog_lockRevision").toInt();  // Gets the lock revision
    auto model = Blog::get(id, rev);  // Gets a Blog object

    if (model.isNull()) {
        QString error = "Original data not found. It may have been updated/removed by another transaction.";
        tflash(error);
        return 0;
    }

    auto blog = request.formItems("blog");  // Gets the form data
    model.setProperties(blog);              // Sets the form data
    if (!model.save()) {                    // Saves the object to DB
        texport(blog);
        QString error = "Failed to update.";
        texport(error);
        return -1;
    }

    QString notice = "Updated successfully.";
    tflash(notice);
    return 1;
}

bool BlogService::remove(int id)
{
    auto blog = Blog::get(id);  // Gets a Blog object
    return blog.remove();       // Removes it from DB
}
Lock revision is used to realize the optimistic locking. See “model”, which comes later in this chapter, for more information.
As you can see, you can use the texport method to pass data to the view (template). The argument for this texport method is a QVariant object. QVariant can be any type, so int, QString, QList, and QHash can pass any object. For more details on QVariant, please refer to the Qt documentation.
View Mechanism
Two template systems have been incorporated into TreeFrog so far. These are the proprietary system (called Otama) and ERB. As is familiar from Rails, ERB is used for embedding into HTML.
The default view that is automatically generated by the generator is an ERB file. So, let’s take a look at the contents of index.erb. As you can see, the C++ code is surrounded by <% … %>. When the render method is called from the index action, the content of index.erb is returned as the response.
<!DOCTYPE HTML>
<%#include "blog.h" %>
<html>
<head>
  <meta http-equiv="content-type" content="text/html;charset=UTF-8" />
  <title><%= controller()->name() + ": " + controller()->activeAction() %></title>
</head>
<body>
<h1>Listing Blog</h1>

<%== linkTo("New entry", urla("entry")) %><br />
<br />
<table border="1" cellpadding="5" style="border: 1px #d0d0d0 solid; border-collapse: collapse;">
  <tr>
    <th>ID</th>
    <th>Title</th>
    <th>Body</th>
  </tr>
<% tfetch(QList<Blog>, blogList); %>
<% for (const auto &i : blogList) { %>
  <tr>
    <td><%= i.id() %></td>
    <td><%= i.title() %></td>
    <td><%= i.body() %></td>
    <td>
      <%== linkTo("Show", urla("show", i.id())) %>
      <%== linkTo("Edit", urla("save", i.id())) %>
      <%== linkTo("Remove", urla("remove", i.id()), Tf::Post, "confirm('Are you sure?')") %>
    </td>
  </tr>
<% } %>
</table>
Another template system
Otama is a template system that completely separates the presentation logic from the templates. The template is written in HTML and a “mark” element is inserted as the start tag of the section to be rewritten dynamically. The presentation logic file, written in C++ code, provides the logic in relation to the “mark”.
The following example is a file, index.html, that is generated by the generator when it is specified in the Otama template system. This can include the file data, but you will see, if you open it in your browser as it is, because it uses HTML5, the design does not collapse at all without the data.
<!DOCTYPE HTML>
<html>
<head>
  <meta http-equiv="content-type" content="text/html;charset=UTF-8" />
  <title data-tf="@head_title"></title>
</head>
<body>
<h1>Listing Blog</h1>
<a href="#" data-tf="@link_to_entry">New entry</a><br />
<br />
<table border="1" cellpadding="5" style="border: 1px #d0d0d0 solid; border-collapse: collapse;">
  <tr>
    <th>ID</th>
    <th>Title</th>
    <th>Body</th>
    <th></th>
  </tr>
  <tr data-tf="@for">               ← mark '@for'
    <td data-tf="@id"></td>
    <td data-tf="@title"></td>
    <td data-tf="@body"></td>
    <td>
      <a data-tf="@linkToShow">Show</a>
      <a data-tf="@linkToEdit">Edit</a>
      <a data-tf="@linkToRemove">Remove</a>
    </td>
  </tr>
</table>
</body>
</html>
A custom attribute called ‘data-tf’ is used to turn on the “mark”. This is a Custom Data Attribute as defined in HTML5. A string beginning with “@” is used as the value for the “mark”.
Next, let’s look at the index.otm corresponding to the presentation logic.
The mark, which links to the associated logic, is declared in the above template, and continues in effect until a blank line is encountered. The logic is contained in the C++ part of the code.
Operators (such as == ~ =) are also used. The operators control different behaviors (for more information see the following chapters).
#include "blog.h"  ← This is as it is C++ code to include the blog.h
@head_title ~= controller()->controllerName() + ": " + controller()->actionName()

@for :
tfetch(QList<Blog>, blogList);  /* Declaration to use the data passed from the controller */
for (QListIterator<Blog> it(blogList); it.hasNext(); ) {
    const Blog &i = it.next();        /* reference to Blog object */
    %%      /* usually, for loop statements, to repeat the child and elements  */
}

@id ~= i.id()   /* assigns the results of i.id()  to the content of the element marked with @id */

@title ~= i.title()

@body ~= i.body()

@linkToShow :== linkTo("Show", urla("show", i.id()))  /* replaces the element and child elements with the results of linkTo() */

@linkToEdit :== linkTo("Edit", urla("edit", i.id()))

@linkToRemove :== linkTo("Remove", urla("remove", i.id()), Tf::Post, "confirm('Are you sure?')")
The Otama operators, (and their combinations) are fairly simple:
~ (tilde) sets the content of marked elements to the result of the right-hand side,
= output the HTML escape, therefore ~= sets the content of the element to the results of the right-hand side then HTML-escape, if you don’t want to escape HTML, you can use ~==.
: (colon) replaces the result of the right-hand child elements and the elements that are marked, therefore :== replaces the element without HTML escape.
Passing Data from the Service or the Controller to the View
In order to use the exported data (objects) in the view, you need to declare its variables by the tfetch() function. For the argument, specify type of the variable and the variable name. The variables are the same state as immediately before the specified variables are exported, and can be used exactly the same way as a normal variable of C++.
Here is an example in use :
Service side :
 int hoge;
 hoge = ...
 texport(hoge);

View side :
 tfetch(int, hoge);
The Otama system, generates the C++ code based on the presentation file and the template file. Internally, tmake is responsible for processing it. After that the code is compiled, with the shared library as one view, so, the operation is very fast.
HTML Glossary
An HTML element consists of three components, a start tag, the content, end an tag. For example, in the typical HTML element, “<p>Hello</p>”, <p> is the start tag, Hello is the content, and </p> is the end tag.
Model and ORM
In TreeFrog, a model object is a data entity that can be persist and represents a concept, and is a small wrapper around an ORM object. The model object contains the ORM object, which is a has-a relationship (naturally you can create such a model with two or more ORM objects). Since it uses “ORM = Object Model” by default in other framework, in this respect TreeFrog differs from the others.
An O/R mapper named SqlObject is included by default in TreeFrog. Since C++ is a statically typed language, type declaration is required. Let’s take a look at the SqlObject file generated by blogobject.h.
There is charm codes, but the field in the table is declared as a public member variable. It is close to the actual structure, but can be used by CRUD or an equivalent method, (create, findFirst, update, remove). These methods are defined in the TSqlORMapper class and in the TSqlObject class.
class T_MODEL_EXPORT BlogObject : public TSqlObject, public QSharedData
{
public:
    int id {0};
    QString title;
    QString body;
    QDateTime created_at;
    QDateTime updated_at;
    int lock_revision {0};

    enum PropertyIndex {
        Id = 0,
        Title,
        Body,
        CreatedAt,
        UpdatedAt,
        LockRevision,
    };

    int primaryKeyIndex() const override { return Id; }
    int autoValueIndex() const override { return Id; }
    QString tableName() const override { return QLatin1String("blog"); }

private:    /*** Don't modify below this line ***/
    Q_OBJECT
    Q_PROPERTY(int id READ getid WRITE setid)
    T_DEFINE_PROPERTY(int, id)
    Q_PROPERTY(QString title READ gettitle WRITE settitle)
    T_DEFINE_PROPERTY(QString, title)
    Q_PROPERTY(QString body READ getbody WRITE setbody)
    T_DEFINE_PROPERTY(QString, body)
    Q_PROPERTY(QDateTime created_at READ getcreated_at WRITE setcreated_at)
    T_DEFINE_PROPERTY(QDateTime, created_at)
    Q_PROPERTY(QDateTime updated_at READ getupdated_at WRITE setupdated_at)
    T_DEFINE_PROPERTY(QDateTime, updated_at)
    Q_PROPERTY(int lock_revision READ getlock_revision WRITE setlock_revision)
    T_DEFINE_PROPERTY(int, lock_revision)
};
There are methods to query and update the primary key in the TreeFrog’s O/R mapper, but the primary key SqlObject can have only one return primaryKeyIndex() method. Therefore, any table with multiple primary keys should be corrected to return one only. It is also possible to issue more complex queries by using the TCriteria class condition. Please see following chapters for details.
Next, let’s look at the model.
The setter/getter for each property and static method of generation/acquisition of the object are defined. The parent class TAbstractModel defines the methods to save and to remove, because of this, the Blog class is equipped with the CRUD methods (create, get, save, remove) .
class T_MODEL_EXPORT Blog : public TAbstractModel
{
public:
    Blog();
    Blog(const Blog &other);
    Blog(const BlogObject &object); // constructor made from the ORM object
    ~Blog();

    int id() const;      // The following lines are the setter/getter
    QString title() const;
    void setTitle(const QString &title);
    QString body() const;
    void setBody(const QString &body);
    QDateTime createdAt() const;
    QDateTime updatedAt() const;
    int lockRevision() const;
    Blog &operator=(const Blog &other);

    bool create() { return TAbstractModel::create(); }
    bool update() { return TAbstractModel::update(); }
    bool save()   { return TAbstractModel::save(); }
    bool remove() { return TAbstractModel::remove(); }

    static Blog create(const QString &title, const QString &body); // object creation
    static Blog create(const QVariantMap &values);                 // object creation from Hash
    static Blog get(int id);                   // Gets object specified by ID
    static Blog get(int id, int lockRevision); // Gets object specified by ID and lockRevision
    static int count();                 // Returns the amount of blog data items
    static QList<Blog> getAll();        // Gets all model objects
    static QJsonArray getAllJson();     // Gets all model objects in JSON style

private:
    QSharedDataPointer<BlogObject> d;   // Holds the pointer of the ORM object

    TModelObject *modelData();
    const TModelObject *modelData() const;
};

Q_DECLARE_METATYPE(Blog)
Q_DECLARE_METATYPE(QList<Blog>)
Despite the fact that the number of code steps automatically generated by the generator is not high, all the basic functions are covered.
Of course, automatically generated code is not perfect. Real life applications may need to be more complex. The code may not be sufficient as generated, thus some reworking may be necessary. Nevertheless, the generator will save a little time and effort in writing code.
In the background, the code as described above also functions to provide; CSRF measures with cookie tampering check, optimistic locking, and token authentication against SQL Injection. If you are interested, please look into the source.
Video Demo – Sample Blog Application Creation
Search
Languages
Translate
Users Guide
Many Thanks to